|
What
sort of tank?
The vast majority of tanks are now the "frameless" variety:
made of plate glass sheets joined with super-strong silicone adhesive,
there is no longer any need for angle-iron frames to hold the weight
of the water. Smaller tanks may also be made of moulded plastic or perspex,
but this is not suitable for large tanks. Whatever
type of tank you decide on, there is one thing certain - buy the largest
tank you can afford and have space for - if you choose a small tank
you will very soon be wanting something bigger!
A full fish tank is incredibly heavy so you will also need something
substantial to stand it on : purpose-made angle-iron stands are available
to suit all standard tank sizes and are relatively inexpensive, or you
may want to choose a complete cabinet setup, where your tank sits in
a custom-built cabinet with cupboards below it to house or your aquarium
equipment and paraphernalia and a matching hood with concealed lighting
and access to the tank. My present aquarium is in just such a cabinet,
a rectangular 180 litre (50 US gallon) tank with cupboards beneath it,
replacing my former 130 litre (35-gallon) triangular corner tank, also
built into a cabinet with cupboards.
I have also seen beautiful displays of tanks built into redundant fireplaces
or old furniture : the main consideration being, wherever you decide
to place your tank, it MUST be STRONG!!
|
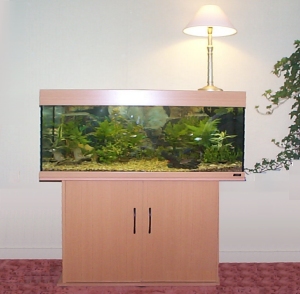
My
new 180 litre tank : concealed lighting in the hood, easy access
for maintenance and feeding, and all the odds and ends associated
with fish-keeping tidily concealed within the cupboard.
|
Having
bought your tank, and its stand or cabinet or whatever, place
it where you want it to go BEFORE you add anything to it. Water
weighs 1kg. per litre ( approximately 8lbs per US gallon) so
the water in my 180 litre tank, when full, weighs around 180
kilos, or around 400 lbs (which in good old British pre-decimal
measures is just over 28 stones.) Add to that the weight of
the actual tank, gravel and any decorations, plus the cabinet
or stand, and you will see that it will be quite impossible
to move once it is set up. In fact, even with only the gravel
and very little water, you would be ill-advised to try to move
it! Even a small tank, of say 24" (60cm) length and holding
a mere 16 US gallons, will weigh almost 140 lbs..... need I
say more?
A
well-lit, well-stocked and well-maintained aquarium is a joy
to behold and a worthy addition to any decor : place
it where you will be able to get most enjoyment from it, but
preferably not near a window - excessive natural light
will give rise to excessive algal growth and the glass will
be subject to unsightly and obscuring growths of algae. Far
better to place your tank away from a window and provide controlled
lighting through the aquarium hood. My tank has two 36"
strip lights, one towards the back of the tank : a yellow-spectrum
"sunlight" lamp, for optimal plant growth and the
other at the front, with an element of UV light which shows
the iridescent colours of the fishes to best advantage.
|

TOP
Filtration
Filtration is the most essential factor of all to ensure the continued
health of your fish. They won't mind if the lights aren't switched
on, or if a bulb or striplight stops working, and providing the room
the tank is in is kept warm, even heater failure is not immediately
catastrophic. The water quality, however, is another matter. The fish
live, eat and breathe in the same water into which they excrete and
so that water must be purified in some way.
There
are two basic methods of filtration, mechanical (in which particles
are physically removed from the water) and biological (in which naturally-occurring
water-borne bacteria are encouraged to remove harmful nitrates from
the water.) Most modern filtration systems combine both methods. This
can be achieved in two ways: by under-gravel filtration and by canister
(either internal or external) filters, or even by using both.
Under-gravel
filters are, as their name suggests, placed underneath the gravel
before the tank is set up, and consist of a plastic plate or plates
which more or less cover the bottom of the aquarium, and a vertical
tube rising from one corner to house the air lift. The plates are
then covered with a layer of gravel (2" minimum depth for it
to work correctly) and so become invisible, and an air-lift is placed
in or on the tube, either in the form of an airstone attached to a
pump or a specially designed power lift pump. This serves to pull
water UP the tube (and back into the aquarium) from under the plates,
and so causes a current of water to pass DOWN through the gravel.
Meanwhile, friendly nitrogen-fixing bacteria will develop in the gravel
(especially if you are able to "seed" it with previously-used
task gravel) and will remove harmful nitrates, produced by the fishes
waste products, excess food and plant debris etc., from the water.
Canister
filters, whether internal or external, work in broadly the same way.
They act as both mechanical and bacterial filters since they contain
a filter medium, or several types of filter, which clean solid, visible
particles from the water and also provide a medium on which the "friendly"
bacteria can grow. The tank I have recently purchased has an integral
internal filter in which the different filter media are placed in
easily removable baskets and the water is drawn through them by means
of a powerhead pump and returned to the aquarium as a water jet (thus
also adding the water movement which most fishes like.) The individual
filters are bacteria-hosting sponges of varying grades, from coarse
to fine, a carbon filter and a fine "floss" filter to remove
the finest suspended particles. The filters are designed to be cleaned
or replaced at varying intervals - the floss replaced weekly, the
carbon monthly, the bacterial (fine) filters cleaned and half replaced
every two or three months, and the coarse bacterial filters cleaned
every six months and replaced only if absolutely necessary. This means
that, once established, the bacterial colony will always be in place
to do its job.
For
more detailed instructions on filter maintenance, click
here.
TOP
Heating
Tropical fish come, by definition, from areas of the world with a
warm climate, and the majority will thrive at a temperature of around
75° Fahrenheit, although fish from equatorial regions may require
the water a little warmer, in the low 80's. A few degrees either way
will not be catastrophic - many fish dealers run their tanks warmer
than recommended, it makes the fish livelier and more attractive to
would-be purchasers, but it also raises their metabolic rate and,
if kept permanently at this temperature, would shorten their lifespan.
(My tanks are always run at 75° and have been for many years.)
Unless you live in the tropics yourself, or keep your central heating
running extremely high, you will need some way of heating the water
in the tank to keep it at this temperature. Aquarium heaters are readily
available and easy to install. Most come with an integral thermostat
which will usually be preset in the factory to this 72°-75°F
temperature and need nothing more than fixing to the back wall of
the tank, plugging in to the electricity supply and switching on (but
don't switch on until after you have added the water!). The latest
internal filters also incorporate a heater, so reducing the technical
expertise needed for setting up a tank to almost zero. In conjunction
with thermostatically controlled heating you should also buy a thermometer
- these are extremely cheap and give a quick check to see that the
heater is functioning OK : they come in a variety of styles, from
internal floating glass ones to liquid crystal strips which stick
to the outside of the glass and show the internal temperature by easily
visible colour changes. Choose whichever you prefer - they all do
the same job.
TOP
Landscaping
(or should that be aquascaping?)
The first requisite with which to decorate your tank is gravel. If you
are going to use an under-gravel filter you
will naturally need to install it before adding the gravel to the tank.
Choose a small to medium sized smooth gravel: colour choice is up to
you and may be subject to availability, but remember that artificially-coloured
gravels will detract from your fish, and some fish species prefer a
darker background. That said, I have chosen a natural gravel for the
base of my tank, in shades of brown, buff and grey. Whatever gravel
you choose, it needs to be washed thoroughly in running water, until
the water coming off it remains clear. Taking the time to do this now
will save you a lot of heartache later on. Tip it carefully into the
tank - any bit which cling to the glass will soon fall down once the
water is added. Smooth the gravel roughly, so it slopes towards the
front and is banked a little higher at the back and sides - this gives
an illusion of depth, and also helps you when it comes to cleaning out
debris etc. as any fallen leaves and leftover food scraps will naturally
collect in this lowest part.
The back of the
tank can be left plain or covered with one of the commercially-produced
"backdrops" which can be bought by the foot or metre from
any aquarists' supplier - simply affix to the outside of the tank with
sellotape and make sure it's pulled across tightly. There are many designs
available and the choice is entirely up to you.
|
Landscaping
can make or mar your tank - there are lots of aquarium ornaments
available - sunken ships, treasure chests, even underwater "waterfalls"
of air-driven fine sand, but do remember that the chief decorations
of your tank will be the fish. Rocks or logs look good, and give
the fish somewhere to hide - if they are artificial there should
be no problem, but stones, rocks and driftwood collected "from
the wild" need to be soaked at length and scrubbed thoroughly
- without soap! - to remove any minerals or toxins which might
leach into the water. If in doubt, buy your decorations from a
dealer.
Unless
you are planning to keep fish which require a particularly specialised
environment, plants will play an important role in your tank.
Not only will they make it look more beautiful and give the fish
somewhere to feel safe and secure - and something to nibble on
- they will also, through the process of photosynthesis, release
essential oxygen into the water. Suitable plants are dealt with
in more detail on this page,
but in general, plant the taller specimens towards the back
and sides and the shorter ones further forwards, keeping the front
and centre clear so you can enjoy seeing your fishes.
|
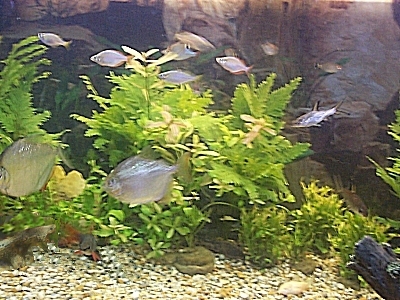
| Rocks
as a backdrop, tall plants at the back of the tank with
smaller ones beneath, and gravel, rocks and stones in the
foreground, all serving to show off the fish in this mixed
community tank. |
|
Place the rocks,
logs etc. roughly where you think you want them to be then have a look
at the effect through the front of the tank - it will be a lot easier
to move them around at this stage, so you can get an effect you like.
Many fish like to be able to hide away for some part of the day, so
you might consider constructing a shelter or cave for them (but make
sure it's stable and won't fall down : you can even glue them together
using the same sort of silicone adhesive as that which holds the tank
together.)
Bury the roots of your chosen plants up to their crowns (where the stems
emerge) in the gravel, being careful not to damage them; unrooted plants
may be weighted with strips of metal sold specially for the purpose
as "plant weights" but be careful not to bruise the delicate
stems. Many plants are now sold ready-planted in small pots or baskets,
and these can be buried in the gravel as they come, and are less liable
to be dug up by any catfish you may have.
TOP
Water
Now you are ready to add the water. Assuming you are planning a non-specialist
or community aquarium, ordinary domestic tapwater will be fine (and
if you are buying your fish locally, they will probably be accustomed
to the local water anyway.) If you want to use rainwater collected in
a water-butt, make sure it is uncontaminated - if in doubt, don't use
it.
The
easiest way to fill the tank will be with a hosepipe, but you may have
to resort to a watering can or even buckets. If you are using a hosepipe,
stand a jam-jar or similar sized container upright on the gravel, away
from the plants and decorations if possible, and place the end of the
hosepipe into that : run the water in gently so that it overflows from
the jar and doesn't disturb the plants, gravel or decorations. If you
have to use a watering can or bucket it is best to protect the plants
etc. with a sheet of strong brown paper : place a plate or shallow bowl
on the paper in a clear area of the tank, being careful not to crush
any plants or dislodge any decorations, and pour the water in as slowly
and carefully as you can.
When
the tank is three-quarters full you can probably remove the jar or plate
and paper and check that the plants are still secure and the rocks and
logs undisturbed. Continue to fill the tank slowly and carefully: many
tanks have a water level marked on them; if not, consider whether you
want the water level to show or whether you want it to reach the base
of the hood. DON'T fill it so full as to touch the lights, as you will
short-circuit them, electrocute your fish and probably cause severe
damage in the process. In fact, don't connect anything up to the electricity
supply just yet.
TOP
To
aerate or not?
This is a much-debated topic amongst fish keepers. In theory, the oxygen
in the water - which the fish need to breathe - is absorbed from the
air at the surface of the water and also released into the water by
the aquarium plants when they photosynthesise during hours of daylight
(or tank-light.) A good collection of healthy, growing plants is the
best means of ensuring well-aerated water for your fish. At one time,
an air-stone delivering a curtain of bubbles up the back wall of the
tank was part of standard aquarium equipment. There is no scientific
reason for this - the bubbles produced do not get absorbed but simply
burst at the surface, but even so, my fish seem happier if I have an
air-pump running to create a bubble curtain - and so I have an airstone
in my tank.
TOP
Now
- plug in and switch on all the aquarium equipment and ensure that the
heater, filter, pump and lights are all working satisfactorily. DON'T
be tempted to add any fishes at this stage. Let the heater do its job
and bring the water to the correct temperature, let the filter clarify
the water by removing the inevitable dust particles etc. from the water,
and let the plants settle into their growing positions. If you can bear
to, leave the tank for at least two weeks before you even think about
adding any fish. During this period, switch the tank lights on in the
morning and off in the evening, exactly as you would if there were fish
in the tank - this will encourage the plants to establish themselves.
This period will also allow dissolved chlorine etc., used in the treatment
of domestic water, to disperse naturally - chlorinated water is harmful
to fish and if you do have to use "un-aged" water, treat it
with a commercial dechlorinator, available from your aquarists' supplier.
After
two weeks have elapsed, and if the water is clear and the plants are
beginning to grow well, you can introduce your first fish - their waste
products will "kick-start" the biological filter and get the
whole system going. Choose something hardy - two or three specimens
of one of the Corydoras species and a small shoal of one of the
hardier tetras - I started my present tank off with two albino Corydoras
aeneus and six Red-eye Tetras Moenkhousia sanctaefilomenae. If
these fish show no problems, after a week add a few more fish and build
up gradually until it is fully stocked - don't feel tempted to go over
the recommended limit; the system
will be unstable for the first six weeks or so, so be prepared to rescue
the fish and have the water quality checked if you suspect anything
is wrong. Don't add any valuable or delicate fish until you are quite
sure that everything is OK.
|